CrowdStrike is a cybersecurity company that offers a unique approach to threat detection and response. Their cloud-native platform leverages artificial intelligence and machine learning to analyze data from endpoints, networks, and cloud environments and IOT devices in real-time, providing unparalleled visibility into potential threats. CrowdStrike’s Falcon platform also incorporates proactive threat hunting, automated remediation, and threat intelligence services to provide a comprehensive security solution. This combination of advanced technology and human expertise sets CrowdStrike apart in the crowded cybersecurity market.
In this article, I will talk about how to apply the Prevention Policy that we protect our endpoints to a Host Group and the features included in the Prevention Policy.
Assigning Policy to the Host Group
1- First of all, let’s go to the relevant page to create a Prevention Policy.

2- Then let’s create a new Prevention Policy.

3- Let’s choose a target OS to avoid creating a policy.

4- Let’s go to the Assigned host Groups tab and assign a Host Group to our Policy.

5- Lets click to Add group to policy

6- Let’s select the Host Group that you have created before, and then click the Add Groups To Policy button.

7- Then let’s enable our policy

All endpoints within our Host Group will now receive the Test Policy we assigned. Let’s take a look at what features prevention policies include and what kind of attacks they protect us against.
Prevention Policy’s Features
1- Sensor Capabilities Tab

A- Notify End Users: If Falcon Sensor has taken an action on the endpoint, this is the setting required to inform the endpoint about the action taken. These messages also show up in the Windows Event Viewer under Applications and Service Logs.
B- Unknown Executables: You must enable this setting if you want to upload all unknown executables to the cloud for advanced analysis. However, before activating it, if there is a potential for a problem due to regulation dependency, you should consult the relevant authorities before activating this setting.
C- Unknown Detection-Related Executables: If you want to upload detection-based executables to the cloud for analysis, you must enable this setting. What I said about the Regulations in the previous article is also valid here.
D- Sensor Tampering Protection: It is a critical setting that protects the sensor’s folders, files, registers from being modified or deleted. If this is not enabled, such malicious attempts will be detected but not blocked.
2- Sensor Visibility -> Enhanced Visibility Tab:

A- Additional User Mode Data: It collects some additional data from user mode that we cannot collect in Kernel Mode. Some prevention features require this feature to be turned on.
- Exploit Mitigation > Force ASLR
- Exploit Mitigation > Force DEP
- Exploit Mitigation > Heap Spray Preallocation
- Exploit Mitigation > SEH Overwrite Protection
- Exploit Mitigation > NULL Page Allocation
- Exploitation Behavior > Code Injection
- Lateral Movement and Credential Access > Credential Dumping
B- Interpreter-Only: Interpreter-Only helps the powershell engine whether amsi-based and amsi-emulation-based commands are being abused. In endpoints without AMSI feature, it provides this observation via dll injection.
C- Engine (Full Visibility): Interpreter-Only intercepts execution of PowerShell scripts and commands from any application using the PowerShell engine via any DLL injection from the Engine (full visibility), at the point where the builtin powershell interpreter provides visibility to applications.
D- Script-Based Execution Monitoring: Activating this setting allows us to monitor the contents of the shell and scripts of powershell, which is one of the popular attack mechanisms. This setting does not kill the process, only monitors it.
This setting allows the commands of any application using any powershell engine to be followed, just like Engine (Full visibility) and it does this through AMSI.
E- HTTP Detections: With this setting, unencrypted HTTP traffic and certain encrypted traffic are monitored and detection is provided.
F- Redact HTTP Detection Details: If this setting is checked, when the detection information from the previous HTTP detection will be sent to the cloud, it will edit and send some personal information, that is, it will not send them to the cloud.
G- Hardware-Enhanced Exploit Detection: Provides visibility into application exploits by detecting suspicious control flows and using CPU hardware features.,
3- Sensor Visibility -> Hardware-Enhanced Visibility Tab:

A- Memory Scanning: It provides visibility against attacks called file-less* or executable-less*. This setting allows the sensor to perform memory scans looking for artifacts in memory. Scans are triggered by certain observed behaviors and patterns.
B- Scan with CPU: We can enable this setting so that it can perform Memory Scan with non-integrated GPUs and virtual CPUs.
4- Sensor Visibility -> Firmware Tab:

BIOS Deep Visibility: It checks the bios images in the environment and can find the different ones. It can provide this protection even at a low level such as BIOS.
5- Next-Gen Antivirus -> Cloud Machine Learning Tab:

Cloud Machine Learning category includes both Cloud Malware Protection and Adware & PUP.
Cloud Machine Learning is a critical component in detecting and preventing known, emerging and zeroday malware and ransomware attacks.
When making these settings, start detection as higher level before prevention and start it from low. Then continue to eliminate FPs. After making sure that there are no problems with the operation of your applications, gradually increase them to the recommended levels by increasing them one step at a time.
Cloud machine learning does not conflict with traditional antivirus tools.
It is recommended to mark as extra aggressive only in PenTests.
A- Cloud Anti-malware: Cloud based Machine Learning encompasses file analysis and file attribute analysis. CrowdStrike’s cloud AV feature, instead of providing millions of malware hashes on the client,
Provides realtime blocking against known malware with high reliability based on a combination of AV detection and file attributes analyzed by crowdstrike cloud using machine-learning.
-This provides protection against known malware without placing a significant load on the client.
-Each process is queried in real-time on the cloud AV service and its execution is blocked if it matches a highly reliable, known malware.-File analysis includes stopping malware that is statically analyzed and flagged as malicious using CrowdStrike’s machine learning techniques. These techniques allow you to analyze files without running them. It lets you find new malware without needing signatures and relying on antivirus tools.
B- Adware & PUP:-Adware and PUP are functionally the same as Cloud Anti-malware, but focus on executable files classified as Adware and/or Potentially Unwanted Programs (PUPs). Adware and PUPs are generally considered just a nuisance, but they can be used to install malicious files.
6- Next-Gen Antivirus -> Sensor Machine Learning Tab:

In short, it can do this job in the cloud, namely machine learning detections, and it can use sensor-based machine learning even when offline.
Sensor Anti-malware: Provides machine learning-based on-sensor AV protection for malicious files, including offline protection.
Sensor ML has zeroday detection features that traditional AV products cannot match, so we highly recommend enabling Sensor ML Prevention according to CrowdStrike best practices.
7- Next-Gen Antivirus -> On-Demand Scans Machine Learning Tab:

-Falcon machine learning (ML) analyzes files for on-demand scanning as it analyzes files after execution. However, analysis for on-demand scanning is on demand rather than execution.
-Falcon on-demand scanning leverages Cloud Anti-malware and Sensor Anti-malware that provide both online and offline detection.
A- Sensor Anti-malware for End-User Initiated Scans:For offline and online hosts running on-demand scans initiated by end users, apply sensor-based machine learning to identify and analyze unknown executables to detect and prevent malware.
To disable file quarantine, set the prevention slider to Disabled.
B- Cloud Anti-malware for End-User Initiated Scans: For online hosts running on-demand scans initiated by end users, apply cloud-based machine learning that leverages global analysis of executables to detect and prevent malware.
To disable file quarantine, set the prevemtion slider to Disabled.
8- Next-Gen Antivirus -> On-Demand Scans Tab:

USB Insertion Triggered Scan: Automatically initiate a scan when an end user plugs in a USB device.
Note: To activate this feature, it is necessary to activate either sensor or cloud ondemand scanning.
9- Next-Gen Antivirus -> On Write Tab:

A- Detect on Write: Instead of waiting for a Portable Executble(PE) to run, we can use this setting to analyze it when it is written to disk. We must use the Sensor-AntiMalware and Cloud-AntiMalware settings to adjust the detection sensitivity.
B-Quarantine on Write:If we want to quarantine these suspicious PEs while they are being written to disk, we must enable this setting. We must use the Sensor-AntiMalware and Cloud-AntiMalware settings to adjust the prevention sensitivity.
10- Next-Gen Antivirus -> Quarantine Tab:

A- Quarantine & Security Centyer Registiration:Enable Quarantine & Security Center Registration Windows to quarantine executable files after they are blocked by next-gen AV.
If the Quarantine & Security Center Registration is enabled, Falcon registers as AV with the Windows WSC on Windows workstations. This also automatically disables Windows Defender on Windows workstations.*
Server 2016, 2019 and 2022: Defender is enabled by default. If you left it enabled in your configuration, the Quarantine and Security Center Registry key should be disabled once enabled.
• The following Powershell cmdlet can be used to disable Defender: The following Powershell cmdlet can be used to uninstall Defender:
○ Set-MpPreference –DisableRealtimeMonitoring $true
• The following Powershell cmdlet can be used to disable Defender: The following Powershell cmdlet can be used to uninstall Defender:
○ Uninstall-WindowsFeature -Name Windows-Defender
B-Quarantine on Removable Media:When it is prevented on devices such as USB, SD card, which we call Removable media, it ensures quarantine.
11- Next-Gen Antivirus -> Execution Blocking Tab:

A- Custom Blocking: Enable this setting so that you can protect your endpoints with your own private Hash, Domain or IP list. You can enter your own custom values from the IOC management tab.
B- Suspicious Processes: Block processes that CrowdStrike analysts classify as suspicious. Malware focuses on dynamic IOAs such as exploits.
C- Suspicious Registery Operations: This setting blocks processes that exhibit suspicious registry behavior as defined by dynamic IOAs. Focuses on Autostart Extension Points (ASEPs) and security configuration changes.
D- Suspicious Scripts and Commands:
This setting is very important to prevent script-based and PowerShell-based threats.
The Falcon sensor blocks malicious processes trying to hide by converting high-level processes to multiple low-level requests, such as:
• Contents of executed script files
• Typed strings on a PowerShell prompt
• Dynamically executed strings through the Invoke-Expression cmdlet
Commands supplied as a command-line parameter, such as -EncodedCommand
This setting also prevents malicious VBA macros in Microsoft Office products. In addition, if Script-Based Execution Monitoring is enabled, this setting also prevents VBScript, JScript, and Excel 4.0 macros.*
E- Intelligence-Surced Threats:When this setting is enabled, the Falcon sensor blocks processes detected as high severity and classified as malicious by CrowdStrike’s Intelligence analysts. – these focus on highly reliable, static hash-based IOCs. It can be any type of malware, including known malicious portable executable files, ransomware, loaders and keyloggers.*
F- Suspicious Kernel Drivers: With this setting, it blocks kernel mod drivers that CS analysts classify as suspicious. This includes drivers that do not violate HVCI** or SystemGuard rules.
**HVCI:Prevents malware and drivers from being installed by verifying drivers in an operating system boot process.
12- Behavior-Based Prevention -> Exploit Mitigation Tab:
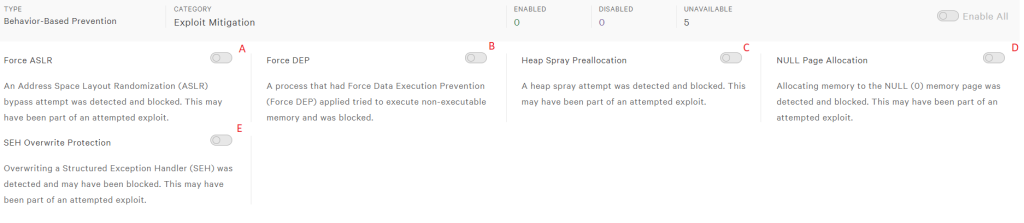
A- Force ASLR:ASLR attempts to prevent attackers from attacking a predetermined memory address by placing the software or operating system installed on a computer system in different locations from each other. Therefore, it becomes more difficult for attackers to inject code or hijack the target system.
B- Force DEP:Prevents a Force-DEPed process from executing a non-executable memory area in memory. It is recommended to test before activating.
C- Heap Spray PreAllocation:
Heap spraying is a technique used to exploit vulnerabilities in software security. It usually involves allocating a large amount of memory on the heap and then filling that memory with executable code. When the vulnerability is triggered, the attacker’s code is executed, allowing them to take over the system.
Pre-Allocation is a technique sometimes used to make heap spray more effective. The attacker pre-allocates memory before it is triggered. This has several advantages:
- It makes the attack more reliable by reducing the time required for the heap spray.
- Allows them to choose the exact location of the sprayed memory, as it is easier to predict where the attacker’s code will end up in memory.
- It may help to circumvent some security features designed to prevent heap spray. For example, some operating systems have features that randomize the location of memory allocations, making it difficult for attackers to predict where their code will end. Pre-allocation can help circumvent these features by having the attacker’s code placed in a predictable location.
When enabled, Heap spray pre-allocation attempts are detected and blocked. This is a popular technique for remotely hijacking browsers. Heap Sprays partition memory, making this type of attack more difficult.
D- Null Page Allocation:Null page allocation is an attack method based on an attacker allocating a specific memory space on the target system during memory management. This memory area is a page of memory, often referred to as a null page. A null page is a memory page that contains no functional code or data and is often used for protection.
E- SEH Overwrite Protection:This feature prevents the program from overwriting the SEH Table**, thus increasing the security of SEH management operations.
**SEH Table:It is a data structure used by the Structured Exception Handling (SEH) mechanism. The SEH table is used to execute SEH, which is a mechanism used to manage errors that may occur during the execution of a program.
13- Behavior-Based Prevention -> Ransomware Tab:

A- Backup Deletion: When enabled, it detects and blocks processes that attempt to delete all shadow copies from popular Ransomware attack steps.
B- Cryptowall: It blocks the most known variants of Cryptowall(ransomware virus).
C- File Encryption: This feature detects and blocks a process that starts encrypting individual files and traverses a directory. A file can be encrypted before the process is terminated.
D- File System Access: This setting is one of the common behavior patterns of ransomwares detects and stops high-volume file operations.
E- Volume Shadow Copy – Audit: An alarm is generated when a suspicious process deletes the Shadow copy. With this setting, legal processes should be whitelisted.
F- Volume Shadow Copy – Protect: It blocks this detected process.
14- Behavior-Based Prevention -> Exploitation Behavior Tab:

A- Application Exploitation Activity:If this setting is enabled, a process like cmd.exe is prevented from spawning from an abused browser or browser flash plugin.
B- Chopper Webshell: Chopper web shell attacks happen when an attacker controls the content of a web page served by an organization’s web server. This malicious web page is used to provide a remote shell to a Chopper client running on a remote attacker machine from a victim server.*
C- Drive-by-Download:If this setting is enabled, it detects and blocks files written and executed from a browser to the temp location. Both the process and the browser are killed.
D- Code Injection: Unexpectedly, a process injecting a conde into another process kills it. Kills processes that attempt to inject powershell into processes such as taskmanager or firefox to evade detection.
E- Javascript Execution via Rundll32:It blocks javascript from executing rundll32 with the help of cmd.
15- Behavior-Based Prevention -> Lateral Movement and Credential Access Tab:

A- Windows Logon Bypass(“Sticky Keys”):It blocks the execution of Windows logon bypass attacks via cmd.exe.
B- Credential Dumping: It kills the processes running credential by reading LSASS processes.
16- Behavior-Based Prevention -> Remediation Tab:

Advanced Remediation: This setting provides some remediate options for IOA detections. These
-Kill Process
-Quarantine Files
-Delete ASEP Register Value
Stay tuned.
Thus, we talked about almost all the features of the prevention policy, in which CrowdStrike protects its endpoints. In my future articles, I plan to talk about what other features CrowdStrike offers and how these features protect our endpoints.
Sources:
*-https://falcon.crowdstrike.com/documentation/209/prevention-policy-settings
*-https://falcon.crowdstrike.com/configuration/prevention/policies/
Leave a Reply